Ejemplo de selección de Folder en la configuración de un portlet Liferay 6.2

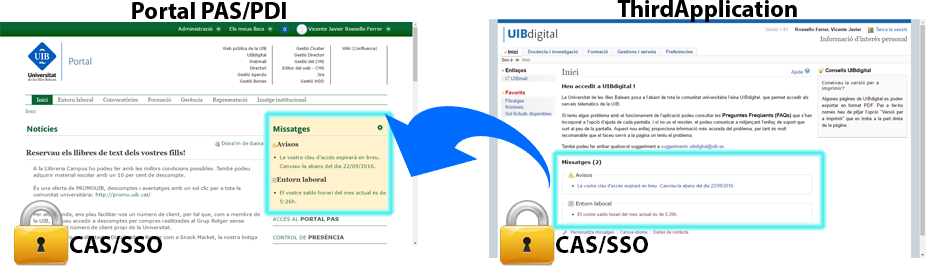
Por necesidades de mi trabajo hemos tenido que crear un portlet que necesitaba seleccionar en las preferencias del portlet una carpeta del Document Library. Buscando y buscando no hemos encontrado ningún código que estuviera «acabado» para usar en un proyecto, así que aquí tenéis como utilizarlo:

En el fichero de «liferay-portlet.xml» hay que configurar la acción para que se puedan guardar las preferencias a partir del fichero config.jsp que creemos.

<?xml version="1.0"?>
<!DOCTYPE liferay-portlet-app PUBLIC "-//Liferay//DTD Portlet Application 6.2.0//EN" "http://www.liferay.com/dtd/liferay-portlet-app_6_2_0.dtd">
<liferay-portlet-app>
 <portlet>
 <portlet-name>UIB Folder Viewer</portlet-name>
 <icon>/icon.png</icon>
 <configuration-action-class>com.liferay.portal.kernel.portlet.DefaultConfigurationAction</configuration-action-class>
 <instanceable>true</instanceable>
 <header-portlet-css>/css/main.css</header-portlet-css>
 <footer-portlet-javascript>/js/main.js</footer-portlet-javascript>
 <css-class-wrapper>uib-folder-display-portlet</css-class-wrapper>
 </portlet>
 <role-mapper>
 <role-name>administrator</role-name>
 <role-link>Administrator</role-link>
 </role-mapper>
 <role-mapper>
 <role-name>guest</role-name>
 <role-link>Guest</role-link>
 </role-mapper>
 <role-mapper>
 <role-name>power-user</role-name>
 <role-link>Power User</role-link>
 </role-mapper>
 <role-mapper>
 <role-name>user</role-name>
 <role-link>User</role-link>
 </role-mapper>
</liferay-portlet-app>

En el fichero config.jsp:

<%@ page import="javax.portlet.PortletPreferences"%>
<%@ page import="com.liferay.portlet.PortletPreferencesFactoryUtil"%>
<%@ page import="com.liferay.portal.kernel.util.StringPool"%>
<%@ page import="com.liferay.portal.kernel.util.Validator"%>
<%@ page import="com.liferay.portal.kernel.util.ParamUtil"%>
<%@ page import="com.liferay.portal.kernel.util.Constants" %>
<%@ page import="com.liferay.portal.kernel.util.GetterUtil" %>
<%@ page import="com.liferay.portal.kernel.util.StringUtil"%>
<%@ page import="com.liferay.portal.kernel.util.HtmlUtil"%>
<%@ page import="com.liferay.portal.kernel.language.LanguageUtil"%>
<%@ page import="com.liferay.portal.kernel.portlet.LiferayWindowState"%>
<%@ page import="com.liferay.portal.util.PortletKeys"%>

<%@ page import="com.liferay.portlet.documentlibrary.service.DLAppServiceUtil"%>
<%@ page import="com.liferay.portal.kernel.repository.model.Folder"%>

<%@ page import="java.util.List,java.util.ArrayList,java.util.Collections" %>
<%@ taglib uri="http://liferay.com/tld/aui" prefix="aui" %>
<%@ taglib uri="http://liferay.com/tld/portlet" prefix="liferay-portlet" %>
<%@ taglib uri="http://liferay.com/tld/theme" prefix="liferay-theme" %>
<%@ taglib uri="http://liferay.com/tld/ui" prefix="liferay-ui" %>

<%@ taglib uri="http://java.sun.com/portlet_2_0" prefix="portlet" %>
<portlet:defineObjects />
<liferay-theme:defineObjects />
<liferay-portlet:actionURL portletConfiguration="true" var="configurationURL" />

<liferay-portlet:renderURL portletConfiguration="true" var="configurationRenderURL"/>

<%
long folderId = GetterUtil.getLong(portletPreferences.getValue("folderToView", "-1"),-1);
int daysToShowNew_cfg = GetterUtil.getInteger(portletPreferences.getValue("daysToShowNew","7"), 7);

String folderName = StringPool.BLANK;

if (folderId > 0) {
 Folder folder = DLAppServiceUtil.getFolder(folderId);
 folder = folder.toEscapedModel();
 folderId = folder.getFolderId();
 folderName = folder.getName();
}
else {
 folderName = LanguageUtil.get(pageContext, "Home");
}
%>

<liferay-portlet:renderURL portletName="<%=PortletKeys.DOCUMENT_LIBRARY_DISPLAY %>" 
 var="selectFolderURL" windowState="<%= LiferayWindowState.POP_UP.toString() %>">
 <liferay-portlet:param name="struts_action" value='/document_library_display/select_folder' /><%--/dynamic_data_mapping/select_document_library' --%>
 <liferay-portlet:param name="redirect" value="<%= themeDisplay.getURLCurrent() %>"/>
 <liferay-portlet:param name="ignoreRootFolder" value="<%= Boolean.TRUE.toString() %>" />
 <%if (folderId>0){ %>
 <liferay-portlet:param name="folderId" value="<%= String.valueOf(folderId) %>" />
 <%} %> 
</liferay-portlet:renderURL>

<aui:form action="<%= configurationURL %>" name="fm" method="post" >
 <aui:input name="<%= Constants.CMD %>" type="hidden" value="<%= Constants.UPDATE %>"/>
 <aui:input name="redirect" type="hidden" value="<%= configurationRenderURL.toString() %>"/>
 <aui:fieldset>
 <aui:field-wrapper> 
 < div class="input-append"> 
 <aui:input type="hidden" name='preferences--folderToView--'/>
 <aui:input label="select-folder" name="folderName" type="resource" value="<%= folderName %>" />
 <aui:button name="selectFolderButton" value="select" />
 </ div>
 </aui:field-wrapper>
 </aui:fieldset> 
 <aui:button-row>
 <aui:button type="submit" />
 </aui:button-row> 
</aui:form>

<aui:script use="aui-base">
 A.one('#<portlet:namespace />selectFolderButton').on('click', function(event) {
 Liferay.Util.selectEntity(
 {
 dialog: {
 constrain: true,
 modal: true
 ,width: 680
 },
 id: '_<%= HtmlUtil.escapeJS(PortletKeys.DOCUMENT_LIBRARY_DISPLAY) %>_selectFolder',
 title: '<liferay-ui:message arguments="folder" key="select-x" />',
 uri: '<%= selectFolderURL.toString() %>'
 },
 function(event) {
 A.log('hola: '+event);
 var folderData = {
 idString: 'folderToView',
 idValue: event.folderid,
 nameString: 'folderName',
 nameValue: event.foldername
 };

 Liferay.Util.selectFolder(folderData, '<portlet:namespace />');
 }
 
 );
 }
 );
</aui:script>


Y en el fichero de portlet.xml:

<portlet-app xmlns="http://java.sun.com/xml/ns/portlet/portlet-app_2_0.xsd" xmlns:xsi="http://www.w3.org/2001/XMLSchema-instance" xsi:schemaLocation="http://java.sun.com/xml/ns/portlet/portlet-app_2_0.xsd http://java.sun.com/xml/ns/portlet/portlet-app_2_0.xsd" version="2.0">
 <portlet>
 <portlet-name>UIB Folder Viewer</portlet-name>
 <display-name>UIB Folder Viewer</display-name>
 <portlet-class>com.liferay.util.bridges.mvc.MVCPortlet</portlet-class>
 <init-param>
 <name>view-template</name>
 <value>/html/folderviewer/view.jsp</value>
 </init-param>
 <init-param>
 <name>config-template</name>
 <value>/html/folderviewer/config.jsp</value>
 </init-param>

...

Espero que os sirva 😉

Publicado en Uncategorized | Deja un comentario

Web clipping de aplicaciones en CAS y Liferay

Objetivos del «proyecto»

El objetivo es mostrar información específica de una página que está en una aplicación con autenticación  SSO (Single Sign On) via CAS (Central Authentication Service), de manera que si la información cambia respecto al usuario conectado esta también cambie dentro del portal Liferay de la misma forma que pasaria entrando en la aplicación destino.

Entonces.. ¿cómo presentamos la información específica por usuario de aplicaciones de terceros que estan securizadas mediante CAS dentro del Portal?

Veamos cómo empezó todo..

El proyecto del portal privado de la Universidad de las Islas Balears (UIB) surge somo respuesta a las peticiones de necesidad de crear un espacio privado por grupos Personal Administración y Servicios (PAS) / Personal Docente e Investigador (PDI)  que permitiera mejorar la comunicación interna mediante la colaboración online así como para establecer un directorio de aplicaciones a las cuales poder acceder.

Además del portal existe el sistema de  consulta de  fichajes, vacaciones, encuestas, nóminas, solicitudes.. de entre otras funcionalidades, una aplicación muy utilizada dentro del colectivo tanto de PAS como de PDI.

Desde hace años hasta hoy el Portal PAS/PDI basado en Liferay es la página de inicio de los ordenadores del PAS, en este se presenta la información relavante respecto del perfil de usuario una vez se han logueado.

Inicialmente la información se editaba y publicaba en el Portal, pero los usuarios demandaban el presentar la información de otras aplicaciones dentro del portal. Para ello  se pretendió mejorar la experiencia de usuario, acercándole la información (de aplicaciones de terceros) relevante y personalizada en la página de inicio.

ideaclipping
La mejora de la comunicación de la información  de los diferentes entornos hacia el usuario hace que esté más satisfecho e informado, así no tendría que ir navegando entre los sitios dónde se le presenta información importante y se mejoraría en usabilidad y en el acceso a la información.

La idea

La recolección o web clipping de información de aplicaciones de terceros desde Liferay suele tener mayor o menor complicación dependiendo de la forma de acceso y la selección de la información. En el entorno de aplicaciones de la UIB existen basicamente dos formas de acceso: autenticación por formulario específico o por autenticación via CAS / SSO.

Para el acceso a la información de aplicaciones con autenticación de formulario específico se podria utilizar el WebProxy Portlet o el IframePortlet si se configurara la URL con los parámetros de usuario y contraseña. Pero para aplicaciones bajo seguridad basada en CAS

Aparecen diferentes soluciones:

  • Iframe portlet: Presenta toda la aplicación dentro de un portlet Iframe, no permite una selección concreta de la información de todo el HTML mostrado.
  • WebProxy Portlet: Podemos seleccionar la parte de información específica via XSLT pero no permite autenticación SSO.
  • Creación de Portlets específicos para cada aplicación con autenticaciones específicas (OAuth, Básica, ..)

Solución adoptada en la UIB:

Creación de portlet para realizar el web clipping de la información y servicio Liferay para la gestión del servicio de tickets de “aplicaciones proxieadas” en cluster y filtros CAS.

Desarrollo

El protocolo SSO de CAS permite la creación dinámica de tickets de usuario desde aplicaciones, llamado CAS Proxy Protocol. Esto permite el poder acceder desde una aplicación a otra que este utilizando CAS como sistema de autenticación.


protocolproxy

La autenticación como usuario desde una aplicación Java  (ya sea un portlet, un servicio, etc) de Liferay nos deja acceder de manera transparente al servicio “proxieado” y así poder consumir sus recursos tal y como lo haria un usuario desde su navegador.

Para ello se utilizan los llamados CAS Proxy Granting Tickets (PGT), unos elementos del protocolo que permiten el crear tickets de servicio TS desde un cliente para así poder crear conexiones como usuario al servicio final.

El desarrollo que se realizó (UIBCasServicePortlet) permite desde un filtro de la aplicación guardar a través de un servicio Liferay estos Proxy Granting Tickets una vez realizada la autenticación típica de SSO. Así pues se almacenaran en un repositorio específico compartido los PGTs entre los diferentes nodos de Liferay que se ejecuten.  De manera que así, via un servicio de Liferay, es posible crear tickets de servicio de aplicaciones de terceros que esten bajo auntenticación CAS.

Para poder realizar el clipping de la información y poder presentarla en el portal era necesario crear un nuevo portlet (UIBCasProxyClippingPortlet) para consumir las funcionalidades del servicio anteriormente citado y crear la conexión a la aplicación final. Un portlet que es configurable para poder indicar la URL y un selector de bloques de código HTML basado en Jsoup.

Véase:

https://github.com/vrossello/uib-cas-service-portlet

https://github.com/vrossello/uib-cas-proxy-bridge-portlet

Conclusiones y futuro

El proyecto está implantado y existe un beneficio en el hecho que el usuario no se desplace entre aplicaciones, un beneficio de usabilidad a la hora de difundir la información en diferentes entornos para así acercar la información específica al usuario.

Se puede mejorar la idea si se amplian, desarrollan o extienden portlets basados en este tipo de conexión securizada con clientes que consuman de una API basada en CAS o clientes HTML como es el del WebProxyPortlet, para así poder tratar todo el HTML generado.

Publicado en Uncategorized | Deja un comentario

Fusionar archivos CSV en Excel (Mac & Windows)

En mi trabajo fue necesario crear una macro para Excel que permitiera fusionar en una sola hoja de Excel diferentes archivos CSV que tenían el mismo formato y número de campos. Para ello cree a partir de otros códigos obtenidos por internet el siguiente código:

Function RDB_Last(choice As Integer, rng As Range)
'Ron de Bruin, 5 May 2008
' 1 = last row
' 2 = last column
' 3 = last cell
    Dim lrw As Long
    Dim lcol As Integer

    Select Case choice

    Case 1:
        On Error Resume Next
        RDB_Last = rng.Find(What:="*", _
                            after:=rng.Cells(1), _
                            Lookat:=xlPart, _
                            LookIn:=xlFormulas, _
                            SearchOrder:=xlByRows, _
                            SearchDirection:=xlPrevious, _
                            MatchCase:=False).Row
        On Error GoTo 0

    Case 2:
        On Error Resume Next
        RDB_Last = rng.Find(What:="*", _
                            after:=rng.Cells(1), _
                            Lookat:=xlPart, _
                            LookIn:=xlFormulas, _
                            SearchOrder:=xlByColumns, _
                            SearchDirection:=xlPrevious, _
                            MatchCase:=False).Column
        On Error GoTo 0

    Case 3:
        On Error Resume Next
        lrw = rng.Find(What:="*", _
                       after:=rng.Cells(1), _
                       Lookat:=xlPart, _
                       LookIn:=xlFormulas, _
                       SearchOrder:=xlByRows, _
                       SearchDirection:=xlPrevious, _
                       MatchCase:=False).Row
        On Error GoTo 0

        On Error Resume Next
        lcol = rng.Find(What:="*", _
                        after:=rng.Cells(1), _
                        Lookat:=xlPart, _
                        LookIn:=xlFormulas, _
                        SearchOrder:=xlByColumns, _
                        SearchDirection:=xlPrevious, _
                        MatchCase:=False).Column
        On Error GoTo 0

        On Error Resume Next
        RDB_Last = rng.Parent.Cells(lrw, lcol).Address(False, False)
        If Err.Number > 0 Then
            RDB_Last = rng.Cells(1).Address(False, False)
            Err.Clear
        End If
        On Error GoTo 0

    End Select
End Function


Sub MergeAllWorkbooks()
    Dim FilesInPath As String
    Dim MyFiles() As String
    Dim SourceRcount As Long, FNum As Long
    Dim mybook As Workbook, BaseWks As Worksheet
    Dim sourceRange As Range, destrange As Range
    Dim rnum As Long, CalcMode As Long
    Dim titleRange As Range

    Dim DefPath As String
    Dim Wb As Workbook
    Dim oApp As Object
    Dim oFolder

    'Folder where you want to save the Excel file
    DefPath = Application.DefaultFilePath
    If Right(DefPath, 1) <> "\" Then
        DefPath = DefPath & "\"
    End If

    'Browse to the folder with CSV files
    
    If Application.OperatingSystem Like "*Mac*" Then
        'MsgBox "I'm a Mac"
         On Error Resume Next
        DefPath = MacScript("choose folder as string")
        If DefPath = "" Then Exit Sub
        On Error GoTo 0
        
        
        'If there are no files in the folder exit the sub
        FilesInPath = Dir(DefPath)
        If FilesInPath = "" Then
            MsgBox "No files found"
            Exit Sub
        End If
    
        'Fill the array(myFiles) with the list of Excel files in the folder
        FNum = 0
        Do While FilesInPath <> ""
            If FilesInPath Like "*.csv" Then
                FNum = FNum + 1
                ReDim Preserve MyFiles(1 To FNum)
                MyFiles(FNum) = FilesInPath
            End If
            FilesInPath = Dir()
        Loop
    Else
        'MsgBox "This machine is a PC"
        Set oApp = CreateObject("Shell.Application")
        Set oFolder = oApp.BrowseForFolder(0, "Select folder with CSV files", 512)
        If Not oFolder Is Nothing Then
            DefPath = oFolder.Self.Path
            If Right(DefPath, 1) <> "\" Then
                DefPath = DefPath & "\"
            End If
        End If
        
        ' If there are no Excel files in the folder, exit.
        FilesInPath = Dir(DefPath & "*.csv")
        If FilesInPath = "" Then
            MsgBox "No files found"
            Exit Sub
        End If
    
        ' Fill the myFiles array with the list of Excel files
        ' in the search folder.
        FNum = 0
        Do While FilesInPath <> ""
            FNum = FNum + 1
            ReDim Preserve MyFiles(1 To FNum)
            MyFiles(FNum) = FilesInPath
            FilesInPath = Dir()
        Loop
    End If


    ' Set various application properties.
    With Application
        CalcMode = .Calculation
        .Calculation = xlCalculationManual
        .ScreenUpdating = False
        .EnableEvents = False
    End With

    ' Add a new workbook with one sheet.
    Set BaseWks = Workbooks.Add(xlWBATWorksheet).Worksheets(1)
    rnum = 1

    ' Loop through all files in the myFiles array.
    If FNum > 0 Then
        For FNum = LBound(MyFiles) To UBound(MyFiles)
            Set mybook = Nothing
            On Error Resume Next
            
            ' Workbooks.Open(DefPath & MyFiles(FNum))
            ' Origin:=xlWindows,
            
            Workbooks.OpenText Filename:=DefPath & MyFiles(FNum), StartRow:=1, _
            DataType:=xlDelimited, TextQualifier:=xlDoubleQuote, _
            ConsecutiveDelimiter:=False, Tab:=False, Semicolon:=True, Comma:=True, Space:=False, Other:=False, OtherChar:=";"
            
            Set mybook = ActiveWorkbook

            On Error GoTo 0

            If Not mybook Is Nothing Then
                On Error Resume Next
                
                With mybook.Worksheets(1)
                    If (rnum = 1) Then
                       Set titleRange = .Range("A1:" & RDB_Last(3, .Cells))
                        If Not titleRange Is Nothing Then
                             Set destrange = BaseWks.Range("B1")
                             destrange.Value = titleRange.Value
                             BaseWks.Cells(1, "B").TextToColumns Destination:=BaseWks.Range("C1"), DataType:=xlDelimited, TextQualifier:=xlDoubleQuote, _
                            ConsecutiveDelimiter:=False, Tab:=False, Semicolon:=True, Comma:=True, Space:=False, Other:=False
                            destrange.Clear
                        End If
                    End If
                   FirstCell = "A2"
                   Set sourceRange = .Range(FirstCell & ":" & RDB_Last(3, .Cells))
                   ' Test if the row of the last cell is equal to or greater than the row of the first cell.
                   If RDB_Last(1, .Cells) < .Range(FirstCell).Row Then
                      Set sourceRange = Nothing
                   End If
                End With


                If Err.Number > 0 Then
                    Err.Clear
                    Set sourceRange = Nothing
                Else
                    ' If source range uses all columns then
                    ' skip this file.
                    If sourceRange.Columns.Count >= BaseWks.Columns.Count Then
                        Set sourceRange = Nothing
                    End If
                End If
                On Error GoTo 0

                If Not sourceRange Is Nothing Then

                    SourceRcount = sourceRange.Rows.Count

                    If rnum + SourceRcount >= BaseWks.Rows.Count Then
                        MsgBox "There are not enough rows in the target worksheet."
                        BaseWks.Columns.AutoFit
                        mybook.Close savechanges:=False
                        GoTo ExitTheSub
                    Else

                        ' Set the destination range.
                        Set destrange = BaseWks.Range("B" & (rnum + 1))
                        
                        ' Copy the file name in column A.
                        With sourceRange
                            BaseWks.Cells(rnum + 1, "A").Resize(.Rows.Count).Value = MyFiles(FNum)
                        End With


                        ' Copy the values from the source range
                        ' to the destination range.
                        With sourceRange
                            Set destrange = destrange.Resize(.Rows.Count, .Columns.Count)
                        End With
                        
                        sourceRange.Select
                        destrange.Value = sourceRange.Value
                       
                        BaseWks.Cells(rnum + 1, "B").TextToColumns Destination:=BaseWks.Range("C" & (rnum + 1)), DataType:=xlDelimited, TextQualifier:=xlDoubleQuote, _
                        ConsecutiveDelimiter:=False, Tab:=False, Semicolon:=True, Comma:=True, Space:=False, Other:=False
                        
                        destrange.Clear

                        rnum = rnum + SourceRcount
                    End If
                End If
                mybook.Close savechanges:=False
            End If

        Next FNum
        BaseWks.Columns.AutoFit
    End If

ExitTheSub:
    ' Restore the application properties.
    With Application
        .ScreenUpdating = True
        .EnableEvents = True
        .Calculation = CalcMode
    End With
End Sub

Publicado en Excel | Deja un comentario

Sincronización Usuarios-Grupos-Roles de Liferay con el LDAP (ApacheDS)

Es muy interesante poder sincronizar los usuarios de Liferay con un LDAP, sea el cual sea para luego poder disponer de un árbol de usuarios de la aplicación final sobretodo si la tenemos que integrar con un Alfresco.

La idea es tener un directorio de usuarios y sus respectivos grupos a los que pertenecen y que este directorio se gestione con el Liferay. Además para mejorar la funcionalidad de asignación de permisos conviene tener una creación de roles a partir de grupos.

Pasos a seguir:

1) Instalamos y arrancamos el Apache Directory Server

2) Creamos la rama para meter los usuarios, de tipo Domain por ejemplo dc=example,dc=com y dentro de esta dos unidades organizativas (ou) los users y los groups.   Así ya tenemos preparado el LDAP.

Configuración del LDAP

3) Configuramos el Liferay: Panel de control -> Settings -> autenticación -> LDAP

Habilitamos el uso del LDAP, creamos un nuevo LDAP server y activamos la Importación y la Exportación.

Configuración:

4) Configurar portal-ext.properties del Liferay (tomcat-6.0.26\webapps\ROOT\WEB-INF\classes) para activar la sincronización de Grupos-Roles, así para cada grupo creado en el LDAP se creará un Rol equivalente. Si no existe el fichero lo creamos:

ldap.import.method=group
ldap.import.create.role.per.group=true
ldap.import.user.password.enabled=false
ldap.import.user.password.autogenerated=true
ldap.import.user.password.default=test
ldap.import.group.base.dn.enabled=true

5) Podemos arrancar el Liferay y a partir de ahora los usuarios los podremos gestionar desde Liferay y se sincronizaran sus grupos y roles con el LDAP y viceversa.

Es importante saber que la actualización de los grupos en el LDAP se realiza cuando se asocian miembros al grupo y que la importación o creación automatica de los roles a partir de los grupos se realiza en procesos específicos:
– en el start del Liferay
– cada cierto tiempo via el com.liferay.portlet.admin.messaging.LDAPImportMessageListener que utiliza la propiedad: ldap.import.interval=10 (10minutos por defecto de portal.properties, que podríamos modificar en el fichero portal-ext.properties con un nuevo valor).
– Podríamos forzar la importación/sincronización de usuarios/grupos/roles mediante el programa si utilizamos el Bean que ya esta definido en Liferay:

<bean id="com.liferay.portal.security.ldap.PortalLDAPImporterUtil">
 <property name="portalLDAPImporter">
 <bean>
 <property name="LDAPToPortalConverter" ref="ldapToPortalConverter" />
 </bean>
 </property>
 </bean>

y le ejecutaríamos el método:

importFromLDAP() que realiza o fuerza entre otras cosas la «creación de roles» a partir de grupos.

Espero que os sirva!

Publicado en LDAP, Liferay, Syncronization | 5 comentarios

Utilidades: Applet Twain Scanner y funciones de tratamiento de imágenes

Hace ya un tiempo la página web de http://www.mms-computing.co.uk/ pusieron una serie de funcionalidades java para el tratamiento de imágenes, luego la página web desapareció. He encontrado en mis archivos el código fuente de esas librerias open source y como no estan en la web principal las vuelvo a subir para que todos puedan acceder.  MMSC SOURCE CODE

mm’s computing: Open source software projects : java, capi (linux and windows), twain (windows), sane (linux), isdn answer phone, A-Law u-Law PCM conversion, isdn fax, sff (simple fax format), Windows XP Printer Port Monitor and Fax Printer Driver.

Publicado en Java | 2 comentarios